EngAIge January Release
Description of the new features
CEP is now known as engAIge
It is with great excitement that we announce that CEP has now been rebranded as engAIge in the upcoming month’s changes to the UI and documentation site will be implemented.

Add Counter Name
Scenario
Example in the Marketing SPOT email campaign, we would like to report on the email campaign. You will now be able to name your counters according to your report required, for instance, “Amount of SMS sent.”
Step 1:
- From the Nav Menu on the left, select Config, then click Counter Name
- Click the button on the right to set your counter name

Step 2:
- Name your counter name according to what you would like to measure e.g. Amount_of_SMS_sent
- Click on Add counter name to save

Step 3:
- You will now be able to count those actions on the server side
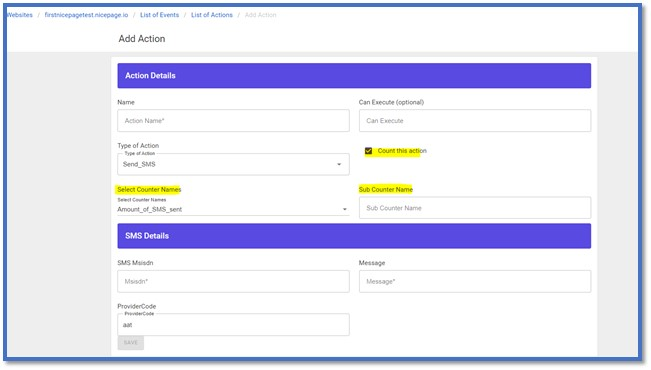
- When you add the action, you will now see a check box. If you tick this box, then you will see options for the counter names you created
- When you click on the drop down for select counter name, you have to type in the field to bring up the options you previously set up
- Sub Counter field you may want to call it the campaign name e.g. MobileStore
- With all actions you will complete the necessary information required to configure that action. The only difference is you can now enable the counter feature by simply configuring your counter name and ticking the box to count this action
Storage of the Data
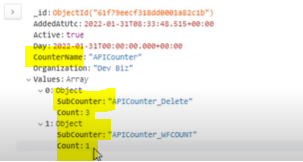
- The data will be stored under the MarketicUIDevDB under MarketicUIDev.DB.CounterMatrix table below as an example, it will show you the counter name and the sub counter name. This will increase the count field incrementally.
- Our current projects will be assisted in establishing the counter names once the business is comfortable to do this themselves.
Add Pixel to Body of email
Scenario
For reporting purposes, the company needed to keep track of open emails. As such, this feature was added.
-
The email pixel is added to the template, so that when the email is opened, it hits our API to let us know it has been opened. Whenever you click publish template on the email template design at this time the dynamic image tag will added so that we can track open emails.
-
By triggering a Bookmark action when the email is opened, we can re-direct the flow of emails we want to send e.g. if the customer opens the email, we can then send a follow up email to remind them to sign up.
Please note you need always add a pause action before Bookmark action
Below you’ll find a Journey for tracking emails opened and sending out communication based on it:
Step 1:
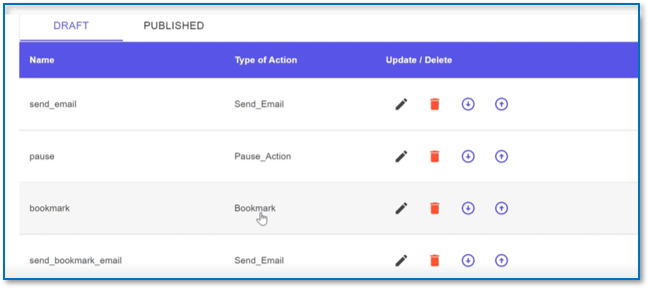
We added the below Type of actions:
-
Send_Email - sent first email to the customer
-
Pause_Action - you can set a delay before the next comm goes out e.g. 3 hours , 0 minutes and 0 seconds so this will allow bookmark action to work next
-
Bookmark - allows you change the flow of your communication
-
Send_Email - sent the last email to the customer , no need to add another pause and book mark action as this is the end of the flow
Please note that the Name fields are just an example; you will be able to define the specific names required
Step 2:
On the email details for the Send_Email action the below fields needs to be populated:
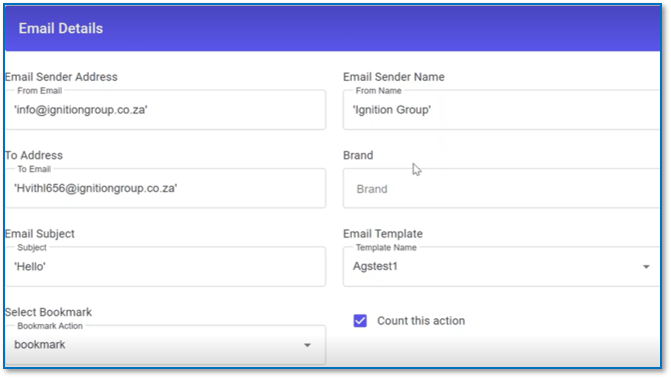
Email Sender Address - make sure you keep the from email as a string, make sure to keep it in single quotes e.g. ‘info@ignitiongroup.co.za’
Email Sender Name - make sure you keep the from name as a string, make sure to keep it in single quotes e.g.‘Ignition Group’
To Address - make sure you keep the to email as a string, make sure to keep it in single quotes e.g. the customer email address ‘agarani.reddy@ignitiongroup.co.za’
Email Subject - make sure you keep the subject as a string, make sure to keep it in single quotes e.g. Hello depending on what you want the email subject to be
Email Template - you will select from the drop list the email that was already configured.
Select Bookmark - you will select the book mark action, you can many book mark actions to select depending how extensive the customer communication Journey is, this is not mandatory
Count this Action - you tick the box so you can count this action e.g. when the email is open it will only increment once like if the customer open the same email 1000 times we wont increment the count.
Select Counter Names - you will type in the counter name you looking for that was already configured e.g. email_counter
Sub Counter Name - is optional you can track as a product or campaign
- Click Save all changes an publish
Step 3:
- Added a BookMark action after the pause action so that we can send the customer a another email
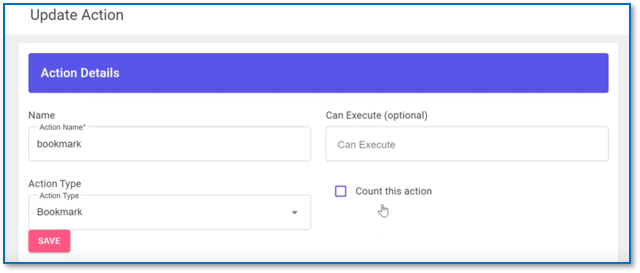
Action Name - You can name the bookmark what you require
Action Type - Select the Book Mark action type from the drop down and click save
Make sure all actions are saved and published
- Once you execute you changes you will receive the first email.

- Once you open the email that will trigger the Book Mark action and send you the second email.
Storage of the Data
-
The data will be stored under the MarketicUIDevDB under MarketicUIDev.DB.EmailPixel
-
The PixelGuid - is unique to each email sent you can use this to also filter the data
-
The table below as an example, it will show you the IsEmailOpen flag as true or false depending if the customer opened the email or not. it will also tell you what time the email was open.
![]()
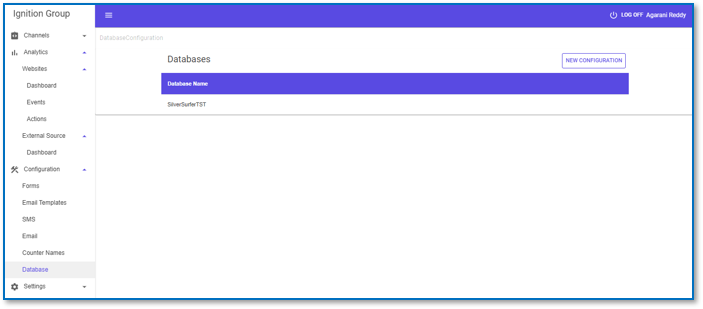
Databases
- Click New Configuration button to set the Database Name, once the Database is configured you can use this to perform the particular DB actions
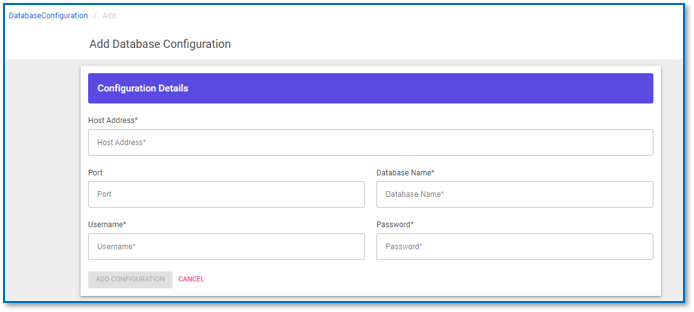
Complete the below information and save the changes:
Host Address - add the host address e.g. like we added the one for Silver Surfer
Port - Is the Port number its not mandatory
Database Name - the actual database name
Username - the username for the database
Password - the password for the database
Storage of the Data
-
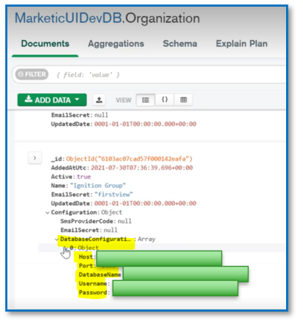
The data will be stored under the MarketicUIDevDB under MarketicUIDev.DB.Organization
-
For security purpose I blocked out the Details of the Database, but when you go into the table you will be able to view this information like below:
Add DB_Lookup Action
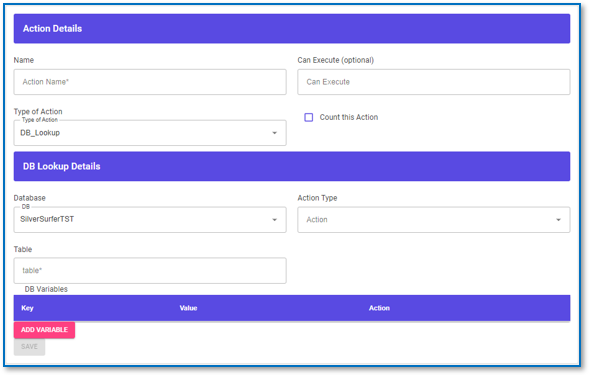
After you add your event select the DB_Lookup action type and complete the below information and save the changes:
Database - this will bring up the already configured Databases e.g. Silver Surfer
Action Type - you will be able to read, update and insert. If you select the read option the two additional fields will appear for you to fill in:
ColumnName - add the column name you want to read e.g. ‘ID number’
ColumnValue - add the column value you want to read e.g. ‘2709014800086’
Table Name - add the Table name you want to read e.g. ‘Admin.SpotAudit’
For the Read option if the query returns multiple results it will take the first results value
-
After you add you action to read the Database you can add an action to send an email, on the email config you will need to add:
Email Subject - this field you will enter Db_Read.result.FirstName
-
When you check your email the customers first name will appear as your subject line this information came from the read functionality for the database bases on a query against the ID number.
-
If you selected the update option you will have to also complete the above together with adding DB Variables key value pair like what are records you would want to update in the database you selected.
-
If you passing the hard coded value then you will need to add to the Variable Value single quotes.
-
If its evaluating from a payload or Javascript then you can add the variables like below with no quotes:
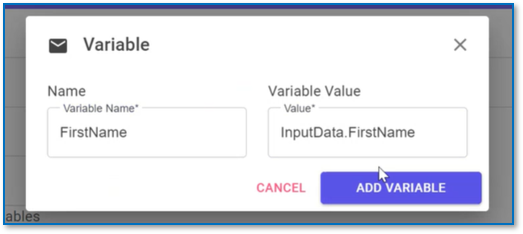
- If you want to insert into the Database you will also need to add the variables like above and add the Table Name on the field.
Added a workflow for LoanGuru Lead Capture on SS
A Lead Gen form was created on EngAIge so that we could use the render_action type to render this from on SS. The below explains the Sale Agents lead gen process:
-
Sales Agent on SS will capture the lead form we created on EngAIge
-
We will store which agent created a lead, so you know how to pay commission
-
Once agent clicks submit the form and API call will be done to SPOT to check if this customer is registered
-
If customer is registered the customer will not receive any comms
-
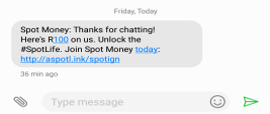
If customer is NOT registered the customer will receive comms with a short link giving customer R100 to get SPOT as per the above screen shot
We also added a Lead Gen workflow that mimicked the VC flexi SPOT workflow, based on the API call if the customer does not have an account we send the customer the below sms:
Storage of the Data
-
The data will be stored under the MarketicUIDevDB under MarketicUIDevDB.EventTrigger and MarketicUIDevDB.ActionTrigger tables.
-
Website - ad-silversurfer.ignitiongroup.co.za
-
WebsiteId- 61b74fd983adb192c0e832b7
-
Event Page Load – EventId - 747f7f18-4671-46db-9464-af178fa38431
-
Form Render Action – ActionId - e7df8bfd-e592-48ac-a5ed-8b93c5fdb5d5
-
Form Submit Event – EventId - 36914ea9-58a6-44a2-b934-60652e54796d
-
Start Workflow Action – ActionId - f487f0ff-6b9a-42b4-bceb-4634e9903a59
-
WorkflowId - SSCEPSpotFormWorkflow - this is the name of the workflow
We added a book mark action that can resume a action sequence