engAIge September Release
Description of the new features
Clear your cache and hit Ctrl F5 to see the latest changes to CEP
Order Action Type
Re-ordering the actions added to an event lets you execute the actions in the sequence you require. An event can be paired with several actions
-
Under the Draft tab, click on the up or down arrows to re-order your list of actions in the order you want it to be published in
-
Click Save to save it to a draft if you’re still editing the list
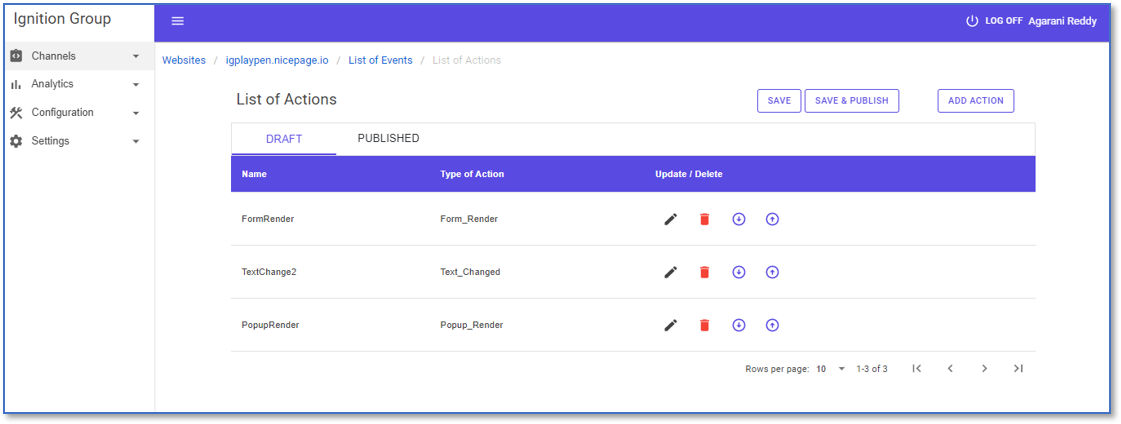
- If you have configured all your actions for that event and have organized them in the sequence you need, you can click on save & publish.
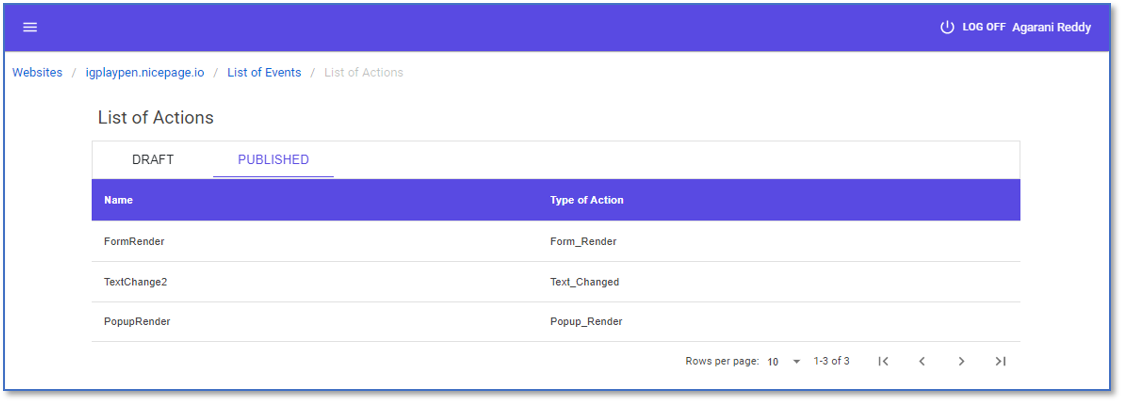
The published list of actions will be carried out in that order, so if you want your draft to appear on the published action list, you must click Save & Publish first
Updated the user interface for the Website Channel
We updated all pages with this styling to improve the user experience
1. List of Websites page
- The page heading has been changed from Websites to List of Websites
- The third column heading has been changed from Action to Update/Delete
- The new ellipses more punctuation mark consists of three dots. When you click on it a drop down menu will appear, and you can select Add Event or Analytics that will direct you to the add event page and website dashboard.
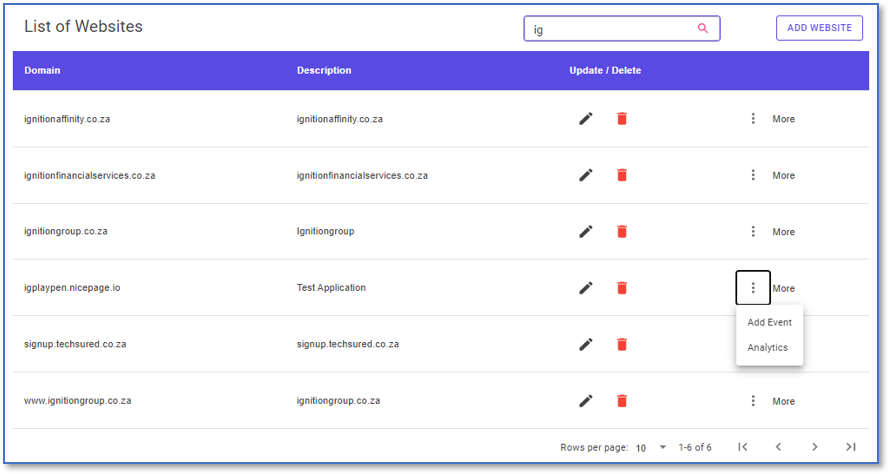
2. When you select Add Event, you will see the following changes
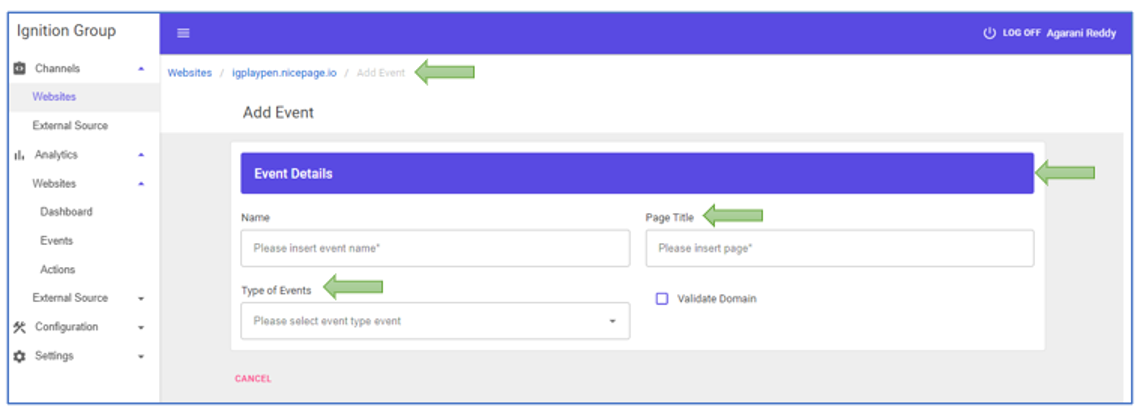
- You will now see, at the very end of the breadcrumb, Add Event rather than Add, to keep track of where you are on the platform e.g. Websites/ignplaypen.nicepage.io/Add Event
- The Event Details heading has been updated to the primary color
- The Text Box Box Title has been changed from Path to Page Title
- The Drop Down Box Title has been changed from Event Type to Type of Events
- The next button now uses the primary color of engAIge instead of pink
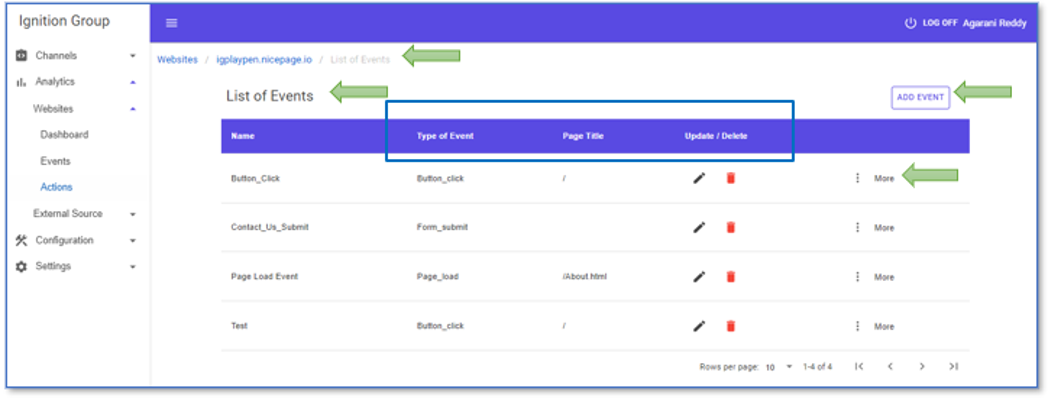
3. When you select Add Analytics it will take you to the website dashboard page where you can click View All Events, you will see the following changes
- You will now see, at the very end of the breadcrumb, List of Events rather than Event, to keep track of where you are on the platform
- The List of Events Details heading on engAIge has been updated to the primary color
- The 2nd, 3rd and 4th column heading has been changed from:
- Event Type to Type of Events
- Path to Page Title
- Action to Update/Delete
- The new ellipses more punctuation mark consists of three dots. When you click on it a drop down menu will appear, and you can select Add Action that will direct you to the add action page
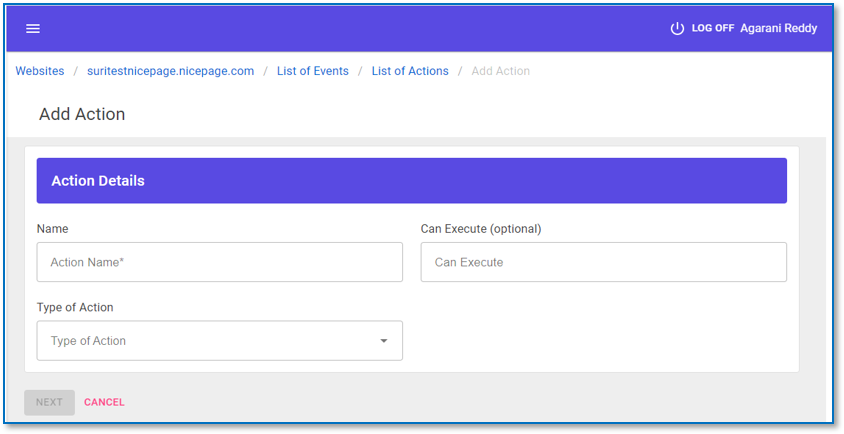
4. When you select Add Action, you will see the following changes
- You will now see, at the very end of the breadcrumb, Add Action to keep track of where you are on the platform
- The Action Details heading has been updated to the primary color
- The Drop Down Box Title has been changed from Action Type to Type of Action
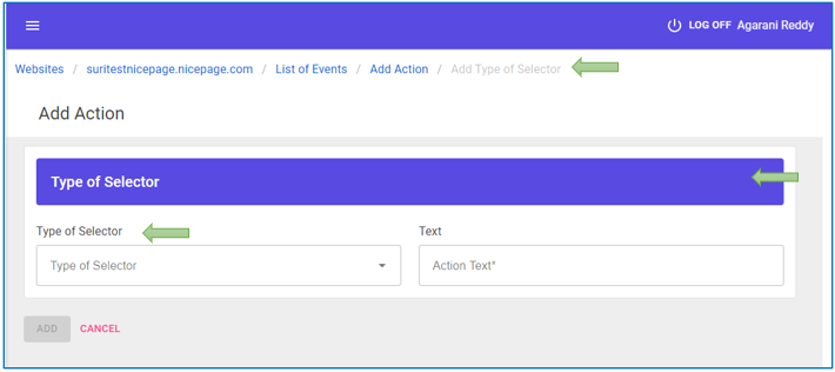
5. After you add an Action, you will Add Type of Selector and see the following changes
- You will now see, at the very end of the breadcrumb, Add Type of Selector to keep track of where you are on the platform
- The Type of Selector heading on engAIge has been updated to the primary color
- The Drop Down Box Title has been changed from Selector Type to Type of Selector
6. As soon as the Selector Type has been added, your action will appear in the Action List and you will see the following changes
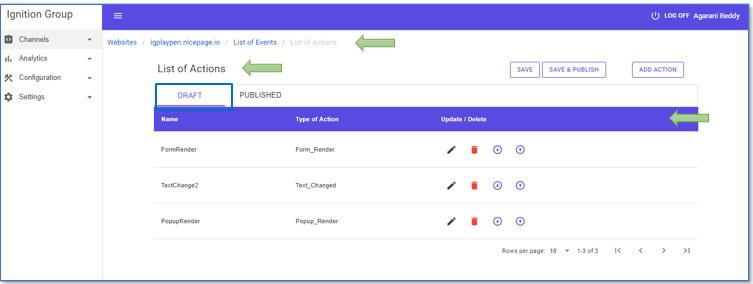
- You will now see, at the very end of the breadcrumb, List of Actions to keep track of where you are on the platform
- Upon adding the Selector Type, it will automatically be saved under Drafts, and then, after you reorder your list of actions using the arrows, it is ready to be published
Updated the User Interface for the External Channel
1. External Source Page
- The new ellipses more punctuation mark consists of three dots. When you click on it a drop down menu will appear, and you can select Add Event or Analytics that will direct you to the add event page or External dashboard.
- The heading on engAIge has been updated to the primary color
- The third column heading has been changed from Action to Update/Delete

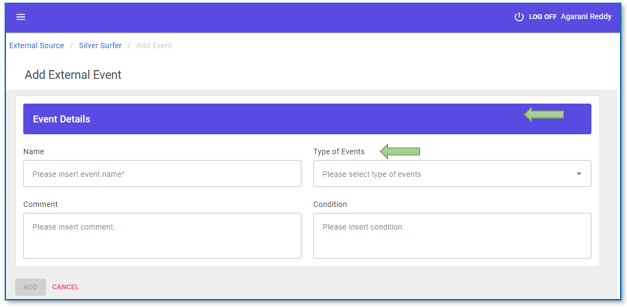
2. Add External Event Page
- The Event Details heading on engAIge has been updated to the primary color
- On the Add External Event Page, the Text Box Box Title has been changed from Event Type to Type of Events
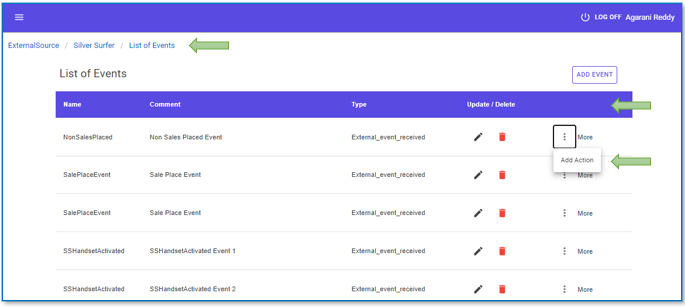
3. List of Events
- You will now see, at the very end of the breadcrumb, Add List of Events to keep track of where you are on the platform
- The third column heading has been changed from Action to Update/Delete
- The heading on engAIge has been updated to the primary color
- The new ellipses more punctuation mark consists of three dots. When you click on it a drop down menu will appear, and you can select Add Action that will direct you to the add action page
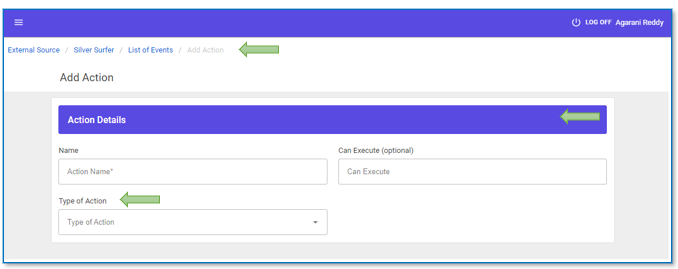
4. Add Action for External Source
- You will now see, at the very end of the breadcrumb, Add Action to keep track of where you are on the platform
- The Action Details heading on engAIge has been updated to the primary color
- The Drop Down Box Title has been changed from Action Type to Type of Action
5. On the list of Events for External Source double click on the Event it will direct you to the List of Actions, you will see the following changes
- You will now see, at the very end of the breadcrumb, List of Actions rather than Action, to keep track of where you are on the platform
- The heading on engAIge has been updated to the primary color
- The 2nd and 3rd column heading has been changed from:
- Action Type to Type of Action
- Action to Update/Delete
- Actions you create will be saved under Draft
- Under the Draft tab, click on the up or down arrows to re-order your list of actions in the order you want it to be published in
- Click Save to save it to a draft if you’re still editing the list
- If you have configured all your actions for that event and have organized them in the sequence you need, you can click on save & publish
- The published list of actions will be carried out in that order, so if you want your draft to appear on the published action list, you must click Save & Publish first
- Re-ordering the actions added to an event lets you execute the actions in the sequence you require. An event can be paired with several actions
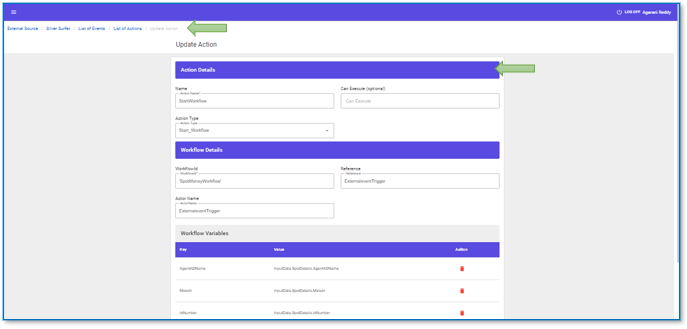
6. Update Action
- All headings have been updated to the primary color
- To view the new look and feel, double click on Update icon
- You will now see, the breadcrumb updated below to External Source / Silver Surfer / List of Events / List of Actions / Update Action to keep track of where you are on the platform, click on the links to return to the page you need.
Support Single Page Application
- In addition to the HTML extension, we will now support Javascript as well
Unsubscribe to emails
- Marketing will use this feature to opt customers out of email communications
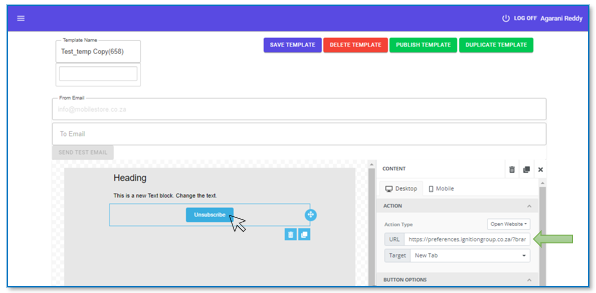
- You can add a text or button to the footer of the HTML design of the email
- By double clicking on the unsubscribe button, you will be brought to the Content Pane where you can add the Action Type URL
- In the Action Type: URL field, for example, you’ll enter the Production URL - https://preferences.ignitiongroup.co.za/?brand=mvnx or Staging URL - https://uatpreferences.ignitiongroup.co.za/?brand=mvnx
- At the end of the URL, replace the word MVNX with whichever brand you wish the customer to opt out of
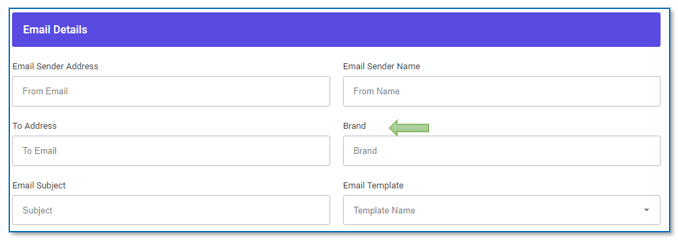
- As part of this send email action type, we added a new field, which is the Brand, which will be used going forward to check if the user has subscribed or unsubscribed to communications.
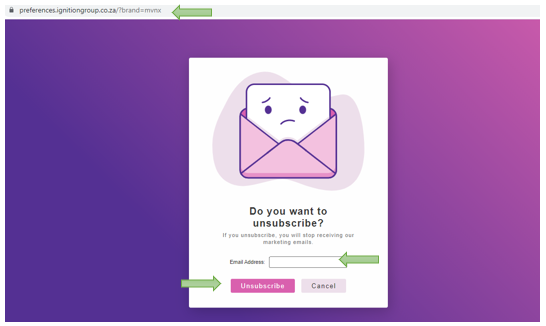
- By clicking on the unsubscribe button the URL will take you to the landing page, based on the URL used for production or staging it will direct you to the relevant page
- On the Landing page the customer will enter the email address and click unsubscribe
- The customer will be Opted Out from communication from that Brand , this will be saved on the Database under the Opt Out Table and saved under the Brand as well as the date the customer unsubscribed to the communication.
- It will unsubscribe the customers from receiving communication for that brand only that you specified
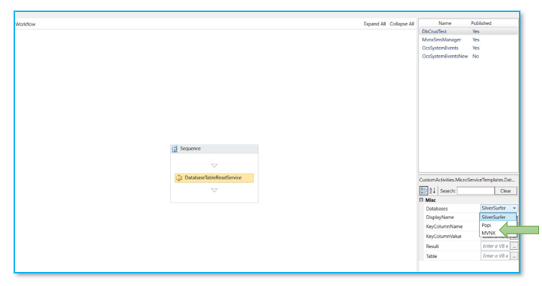
On the workflow editor we added a SQL Database on the Database drop down called MVNX
Support Multiple Mandrill Accounts
-
On the Mandrill Account set up on the Database under organization table we added a new property which is called the email secret that will allow us to support multiple Mandrill Accounts
-
The account to send of comms will be Ignition Group once the API key from Mandrill for MVNX has been encrypted this will generate the secret Key for MVNX
